
728x90
반응형
new project -> spring initializr
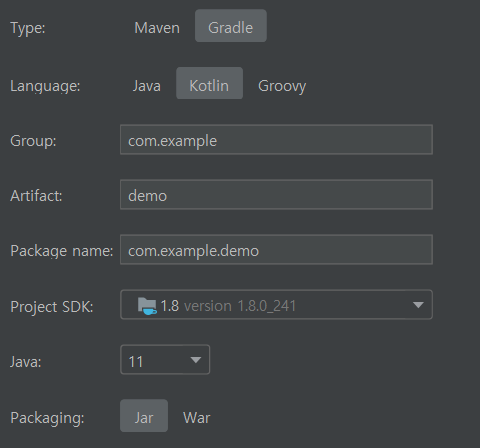
Dependencies 는 Spring Web 만 설정 !

1. HelloApplication
/*
* 스프링 부트는 main 메소드가 선언된 클래스를 기준으로 실행된다.
* main 메소드를 실행하면 여러가지 설정이 읽히고, 내장된 톰캣이 실행된다.
* 그 이유는 @SpringBootApplication 안에 있는 어노테이션 덕분!
*  ==> bean 읽기와 생성이 자동으로 설정됨.
*
* @SpringBootApplication이 있는 위치부터 설정들을 읽어나가기 때문에 이 클래스는 항상
* 프로젝트의 최 상단에 위치해야 한다.
*
* @SpringBootApplication 안에는 3가지의 중요한 어노테이션이 존재한다.
*
* 1) @SpringBootConfiguration
* 2) @ComponentScan
* 3) @EnabledAutoConfiguration
*
* */

@SpringBootApplication // 스프링부트의 가장 기본적인 설정을 선언해준다.
class HelloApplication

fun main(args: Array<String>) {
    runApplication<HelloApplication>(*args) // 내장된 WAS 를 실행한다.
}스프링 부트는 @SpringBootApplication 어노테이션이 붙은 클래스부터 설정파일들을 읽어나가므로,
이 클래스는 항상 프로젝트의 최 상단에 위치해야 한다.
실행시, 기본 port인 8080으로 실행이 되는데, 이 port를 수정하고 싶다면 application.properties 에
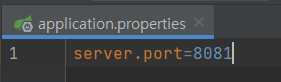
위와 같이 port를 지정해주면 된다.
2. Get API 만들기
package com.example.hello.controller

import org.springframework.web.bind.annotation.GetMapping
import org.springframework.web.bind.annotation.RequestMapping
import org.springframework.web.bind.annotation.RestController

@RestController // 해당 Class 는 REST API를 처리하는 Controller, JSON을 반환하는 컨트롤러라는 의미.
@RequestMapping("/api") // API 주소를 할당, RequestMapping은 URL를 지정해주는 Annotation
class ApiController {

    // 예전에는 @RequestMapping(method=RequestMethod.GET) 으로 사용됬던 것을 다음과 같이 간단하게 쓸 수 있음.
    @GetMapping("/hello") // http://localhost:8081/api/hello
    fun hello(): String {
        // 해당 url로 get방식으로 요청이 들어오면 다음과 같은 문자열을 리턴하겠다.
        return "hello spirng boot";
    }
}package com.example.hello.controller
import com.example.hello.dto.UserRequest
import org.springframework.web.bind.annotation.*
import java.lang.StringBuilder
@RestController
@RequestMapping("/api/get")
class GetApiController {
@GetMapping(path = ["hello"]) // http://localhost:8081/api/get/hello
fun hello(): String {
return "/api/get/hello"
}
@RequestMapping(path = ["/hi"], method = arrayOf(RequestMethod.GET))
// get / post / put / delete 다 실행. 그러므로 무슨 method 속성을 쓸 것인지 설정해주어야 한다.
fun hi() : String {
return "hi"
}
// http://localhost:8081/api/get/path-variable/{name}
// 변화하는 값을 가져올 때 Path Variable 로 받을 수 있다.
@GetMapping("/path-variable/{name}")
fun pathVariable(@PathVariable(value = "name") name: String): String {
return "return : ${name}"
}
// query parameter : ?key1=value1&key2=value2
// http://localhost:8081/api/get/query-param?user=steve&email=steve@gmail.com&age=30
// map 으로 받으면 무엇이 들어올 지 모르게 된다.
@GetMapping(path = arrayOf("query-param"))
fun queryParam(@RequestParam queryParam: Map<String, String>): String {
val sb = StringBuilder()
queryParam.entries.forEach { entry ->
val str = entry.key + "," + entry.value
sb.append(str)
}
return sb.toString()
}
@GetMapping("query-param02")
// 명시적으로 변수로 받기 위해서는 @RequestParam 을 사용한다.
// 400 에러: 클라이언트가 실수
fun queryParam02(
@RequestParam name: String,
@RequestParam email: String,
@RequestParam age: Int
): String {
return name + "," + email + ", " + age;
}
// @requestParam 은 넣지 않는다.
@GetMapping("query-param03")
fun queryParam03(request: UserRequest): String {
return request.toString()
}
}path로 클라이언트에게 값을 가져오고 싶다면, @PathVariable 을 사용
query-param으로 받고 싶다면 @RequestParam 을 사용하되, 매번 @RequestParam 을 지정해주기 어려우니
해당 Dto를 통해 받자.
@GetMapping("/path-name/{path}")
fun apiFunctionName(@PathVariable path: String) ==> http://localhost:port/api/get/path-name/1234
@GetMapping("/path-name02")
fun apiFunctionName02(@RequestParam query: String, @RequestParam query02: String) ==> http://localhost:port/api/get/path-name02?query=1&query02=2
@GetMapping("/path-name03")
fun apiFunctionName03(query: QueryRequest) ==> http://localhost:port/api/get/path-name03?query=1&query02=2...
728x90
반응형
'⚙️Backend > Spring Boot' 카테고리의 다른 글
| [Spring Boot/IntelliJ] Todo List 구현 3 (0) | 2021.06.06 |
|---|---|
| [Spring Boot/IntelliJ] Todo List 구현 2 (0) | 2021.06.06 |
| [Spring Boot/IntelliJ] Todo List 구현 1 (0) | 2021.06.05 |